
With iOS14, you can now customize your iPhone’s home screen with widgets. Introducing how to use “Widgetsmith”, a free app that is convenient for creating your favorite widgets and designing your home screen.
“Widgetsmith” that can be easily used even if it does not support Japanese
We have introduced a number of home screens that can be called works, customized using widgets, which are new features of iOS14, but the app used by many iPhone users who have appeared is “Widgetsmith”.
The basic functions of “Widgetsmith” are free and you can use it without user registration. The menu is in English because it does not support Japanese, but if you learn how to use it easily, you can freely create your own widget.
In this article, I will introduce how to use “Widgetsmith” in the following order.
- What kind of app is “Widgetsmith”?
- Flow of how to use “Widgetsmith”
- Let’s use “Widgetsmith”!
1. What kind of app is “Widgetsmith”?
“Widgetsmith” is an app developed by David Smith, an independent developer living in Virginia, USA.
Introducing Widgetsmith. Fully customizable, scheduleable widgets for iOS 14, including widgets for Date, Time, Weather, Calendar, Reminders, Health, Tides & Astronomy. You choose the fonts, colors and appearance. Take control of your home screen. Https: / /t.co/7BLTa31r3z pic.twitter.com/hUIbn01x3I
— David Smith (@_DavidSmith) September 16, 2020
Immediately after it was released at the same time as iOS 14 in September 2020, its popularity exploded, and at the time of writing this article, it is a popular app that has won first place in the “Top Free Apps” of the App Store.

Even after the release, new features and various corrections are frequently made by updates.
You can use the basic functions of the app for free, but you need to register for a fee (¥ 200 / month or ¥ 2,100 / year) to use widgets such as weather and tides. First of all, it is better to start with the free function.
In addition, when I tried how many widgets I could make with Widgetsmith, I was able to continue making even if it exceeded 100.
2. Flow of how to use “Widgetsmith”
The basic flow of using “Widgetsmith” is as follows.
- Select the widget of the size you want to make
- Try to make a widget
- Try to place the widget
- Try a little advanced usage
3. Let’s use “Widgetsmith”!
Follow the steps I introduced earlier to place a calendar on your home screen using Widgetsmith.
1. Select the widget of the size you want to make
When you start “Widgetsmith” for the first time, you will see a screen like this. You can choose from three sizes of widgets: Small, Medium, and Large.

As for the size of the widget, Small uses 4 normal app icons, Medium uses 8 spaces, and Large uses 16 spaces.

Here, let’s choose the Small size.
2. Try to make a widget
Let’s create the widget you want to display on the home screen with “Widgetsmith”.
Here, tap the widget in “Small Widgets” to customize it.

You can customize it by tapping the default simple widget that displays the day and date in black and white.

The following styles can be selected in “Widgetsmith”. The amount of information that can be displayed at one time changes depending on the size of the widget.
- Time: Clock. Supports foreign time by changing the location
- Date: Date.Can be combined with the day of the week and displayed on the calendar
- Custom: Photo, photo and date, favorite character string, blank can be selected
- Battery: Battery level icon
- Calendar: Appointments on the iPhone calendar
- Reminders: Contents of iPhone reminders
- Weather (charged): temperature, UV information, etc.
- Health & Activity: Activity information, steps from iPhone healthcare
- Tides (paid): Tide ebb and flow
- Astronomy: Sunrise / Sunset, Moonlights
Here, let’s select the calendar format “Month”.

Menus with overlapping tabs at the bottom of the screen are items that can be customized.
- Font: Font.
- Tint Color: Text color. Customization is also possible with “Custom”.
- Background Color: Background color. It can be customized with “Custom”.
- Border Color: Border

Tap “Small # 1” on the upper left to display the completed image. You can readjust the colors and fonts by tapping the widget.
You can also change the name by tapping the name of the widget. When you’re done, tap “Save” in the upper right.

3. Try to place the widget
Now let’s place the finished widget!
Press and hold an empty area of the home screen to enter edit mode on the home screen (the same is true if you press and hold the app icon and select “Edit Home Screen” from the menu that appears). Tap the “+” icon displayed in the upper left of the screen.

Type in the search window or scroll to find “Widgetsmith”.

Select the size of the widget you want to add and tap “Add Widget” at the bottom of the screen. Here, tap “Add Widget” while “Small” is displayed.

The widget space is displayed on the home screen. You can adjust the positional relationship by long-pressing the widget or app icon.

Tap the widget placed on the home screen to display the saved widget selection screen.
If the widget you want to use is displayed in blue, tap the outside of the menu screen.

The widget has been placed on the home screen!

4. Try a little more advanced usage
Widgets created with “Widgetsmith” can be specified to be replaced depending on the time of day.
By tapping “Add a Timed Widget” under the widget in the “Widgetsmith” app, you can also set to switch to another widget at the specified time zone.

You can add widgets by tapping the “+” mark.

For example, you can set up an app that can display photos and replace your favorite photos every few hours to enjoy.

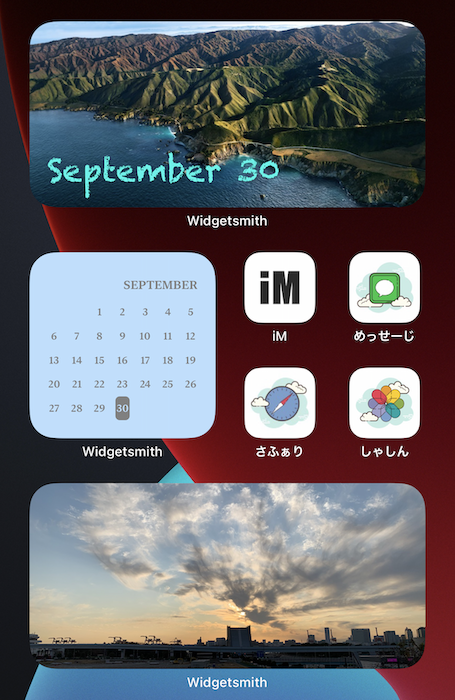
You can also place multiple widgets of different sizes on the home screen to pursue functionality, or place your favorite photos according to your mood.

Enjoy customizing your home screen with “Widgetsmith”!
(hato)
Source: iPhone Mania